SpyCloud Enterprise - Splunk
This guide provides step-by-step instructions for installing and configuring SpyCloud Enterprise Integration.
June 2026 · Version 3.3.3
The SpyCloud Splunk integration consists of two Splunk applications that work together:
- SpyCloud Add-On for Splunk v3.3.0 - The SpyCloud Add-On is responsible for pulling data from the SpyCloud API into Splunk.
- SpyCloud Application for Splunk v3.2.0 - The SpyCloud Application is responsible for displaying and visualizing that data through dashboards and views.
Together, these components enable ingestion and visualization of SpyCloud data within Splunk.
SpyCloud Add-On for Splunk v3.3.0
The Add-On loads SpyCloud Enterprise Account Takeover Protection (EAP) data using the SpyCloud API.
Data Ingested
- Watchlist Breach Records
- Breach Catalog Entries
- Watchlist Identifiers
- Compass Breach Records (if licensed for Compass)
SpyCloud Application for Splunk v3.2.0
The Application provides dashboards and views to explore and analyze the ingested EAP data.
Key Dashboards
- Main Dashboard
- Watchlist View
- Infected Users View
Licensing Requirements
You need a Splunk license and a compatible version of:
- Splunk Enterprise or Splunk Cloud Platform
- Supported versions: 10.3, 10.2, 10.1, 10.0, 9.4, 9.3, 9.2, 9.1
- CIM version: 8.x, 6.x, 5.x, 4.x, 3.x
You also need a SpyCloud EAP license with an API key deployed and available at:
portal.spycloud.com/api
Installation Preparation
Deployment
The Add-On can be installed by itself, without installing the Application, if you would like to only load SpyCloud data.
The Application does not work without the Add-On, since the Add-On is responsible for loading the SpyCloud data.
If installing both the Add-On and the Application, it is best practice to install the Add-On first, then the Application, since you need the configured index name in order to configure the Application.
The Add-On should ideally be installed on a Splunk instance with a known IP address or IP address range to support SpyCloud API key authentication using the IP Allow List.
For cloud deployments, it may be necessary to work with SpyCloud Support or Customer Success to identify your cloud IP address ranges or to request a special API key that does not require IP allowlist configuration.
Installation of the SpyCloud Add-On for Splunk
On-Prem Installation
- Download the
.splfile for SpyCloud Add-On for Splunk. - From the default UI in Splunk, click the gear icon next to Apps.
-
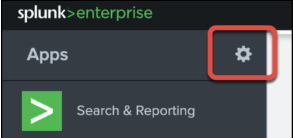
On the main Apps UI, click Install app from file.
-
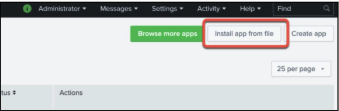
Click Choose File and select the
.splfile for the Add-On, then click Upload.
-
If you are upgrading from a previous version of the SpyCloud Add-On for Splunk, check the Upgrade app option.
If you are upgrading, your API key and index will automatically be migrated to the new Add-On.
After installing, you will be directed to the App page.
- Next, configure the Add-On. See Configuring the SpyCloud Add-On for Splunk below.
SplunkBase Installation
For some customers, the integration may be installed via SplunkBase.
To do so:
- Navigate to the Apps page in Splunk.
- Choose Browse more apps.
- Search for the app and install it as you would any other application.
Once installation is complete, navigate to the application and set it up following the instructions in Configuring the SpyCloud Add-On for Splunk below.
Configuring the SpyCloud Add-On for Splunk (First Time Setup)
- To configure the Add-On, go to the Apps page or the main dashboard and click SpyCloud Add-on for Splunk.
- If this is your first time installing the Add-On, the two most important things to set up are:
- The Index where you want to store your SpyCloud data
- The API Key that the Add-On uses to pull data from the SpyCloud API
Note: If you upgraded from a previous version, your API key and index were automatically migrated to the new version.
-
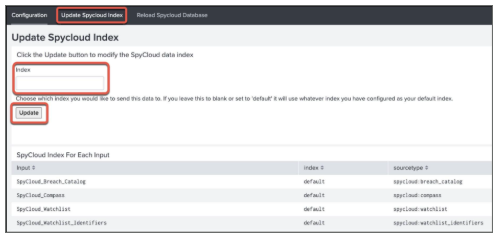
If you want to use an index other than the default, configure your index first by clicking Update SpyCloud Index before setting your API key.
Enter the desired index name and click Update.
If you leave the Index field blank, the Add-On will use the default index for your Splunk instance.
You can always navigate to this screen to see your currently configured inputs.
-
Next, set up your API key by navigating to Configuration → Add-On Settings.
If you want to pull in Compass data and you are entitled to it, check Enable Compass and click Save to validate your API key.
If you have any errors, they are most likely related to an API key issue. Please check the following:
- The IP address for your Splunk instance is specified on the IP Address Allow List for your SpyCloud API key
- You used an active Enterprise ATO API key (not disabled, deactivated, or over quota)
- You copied the entire API key
- Your installation requires a proxy (see proxy configuration below) If you still have issues, contact SpyCloud Support via the SpyCloud Portal to assist with your API key and associated authentication.
-
Next, navigate to Settings → Data Inputs → Scripts to enable and configure your data ingest intervals.
There are source types that pull data in. It is recommended to pull in the breach catalog data first, then proceed to pull in the other three items afterward.
See Data Overview and Configuration for more on configuring these items.
Additional Configuration Options
Proxy Settings
If your site requires a proxy, you can set the proxy under Configuration → Proxy.
Enter the required information for Host, Port, Username, and Password, then click Save.
Logging Settings
By default, the Add-On will log Info or more serious messages.
To change the log level, select the desired log level and click Save.
It is recommended to use a lower log level like Debug when troubleshooting the Add-On.
Logs can be viewed by using queries like the following:
index="_internal" source="/Applications/Splunk/var/log/splunk/ta_spycloud_spycloud_breach_catalog.log"
index="_internal" source="/Applications/Splunk/var/log/splunk/ta_spycloud_spycloud_watchlist.log"
index="_internal" source="/Applications/Splunk/var/log/splunk/ta_spycloud_spycloud_watchlist_identifiers.log"
index="_internal" source="/Applications/Splunk/var/log/splunk/ta_spycloud_spycloud_compass.log"
Reloading the Entire SpyCloud Database
If you ever need to reload the data from SpyCloud, you can click Reload SpyCloud Database, which will pull all your data into Splunk:

This can be useful if you have added a new domain or other watchlist item and want to pull historical data. In order to use this feature, your role must have the can_delete role assigned:

Installation of the SpyCloud Application for Splunk
Installation Prerequisites
You will need the name of the index used when configuring the SpyCloud Add-On for Splunk.
- Download the
.splfile for SpyCloud Application for Splunk. - From the default UI in Splunk, click the gear icon next to Apps.
- On the main Apps page, click Install app from file.
- Click Choose File and select the
.splfile for the application, then click Upload. - You should see a message indicating the installation was successful. Click Set up now to continue setup of the application.
You can choose to ingest data hourly or once a day. Please note that Compass only updates once a day and is not available for hourly ingestions.
Updating or Setting the SpyCloud Index
To update or set the SpyCloud Index, follow the steps below:
- Select SpyCloud App for Splunk from the Apps drop-down menu.
- Click Settings from the top navigation, then select Advanced Search.
- Next, click Search Macros.
- In Search Macros, select the following:
- App: SpyCloud App for Splunk
- Configuration Source: Created In App
- Owner: Any
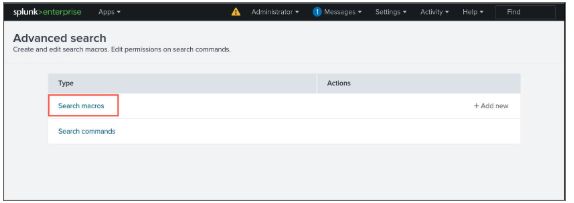
- Click spycloud_index under the Name column.
- On the next screen, modify the value in Definition to be the name of the index.
Note: This should only be the index name and should not contain the index field name.If you do not see any results, you either do not have SpyCloud data in Splunk or your index name is incorrect.
- Click Save to update the macro.
Manually Trigger “Breach Catalog Lookup Population” Search
The Breach Catalog Lookup Population search automatically runs at the top of every hour.
To see results in the dashboard immediately after installing the app, you can manually trigger the search:
- Select SpyCloud App for Splunk from the Apps drop-down menu.
- Click Settings from the top navigation, then select Searches, reports, and alerts.
- Click Run under the Actions column for SpyCloud Breach Catalog Lookup Populator.
Enable the Search “SpyCloud Active User Lookup Populator”
This search populates the Active Employees Who Show Up in Breach Data section on the Watchlist dashboard.
It is only useful if you are ingesting Active Directory data through the Splunk LDAP App.
- Select SpyCloud App for Splunk from the Apps drop-down menu.
- Click Settings from the top navigation, then select Searches, reports, and alerts.
- Click Edit under the Actions column for SpyCloud Active User Lookup Populator.
- Click Enable.
Enable and Set Email for Alerts
Alerts
- SpyCloud - Compromised Active User Alert
- SpyCloud - Compromised Active User Alert - Admin
- Select SpyCloud App for Splunk from the Apps drop-down menu.
- Click Settings from the top navigation, then select Searches, reports, and alerts.
- Click Edit under the Actions column for either alert.
- In the Edit Alert section, under Trigger Actions, update Send email → To with the email address, then click Save.
- Next, click Edit under the Actions column for the selected alert and set it to Enable.
- Read the message in the dialog window, then click Enable.
- Once setup is complete, go to the main Splunk UI and confirm installation by clicking SpyCloud App for Splunk.
- You should see your data presented.
Note: You may need to adjust the Time Range to search for a period where you have records, since the default is only the past 30 days.
Post-Install Configuration
Adding Active Directory Data for Context
You can optionally install and configure the Splunk Supporting Add-on for Active Directory to supplement the data loaded by the SpyCloud Add-on for Splunk.
The SpyCloud Application for Splunk will use this additional context information to show more detailed information.
Data Overview and Configuration
The Add-On loads data into Splunk using four scripted inputs, which can be viewed under Settings → Data Inputs → Scripts.
To edit the schedules for when data is brought in, click the name of the script and adjust the Interval.
Splunk uses a modified cron format to identify the script interval as defined here:
(minute) (hour) (day of month) (month) (day of week)
Examples:
0 0 * * *= Every night at 12:00 midnight0 * * * *= Every hour at :00 minutes30 * * * *= Every hour at :30 minutes
For more on the Splunk Interval setting, see the article about input configuration referenced in the original documentation.
Updated 18 days ago